Jira Acceptance Criteria – What Are They and How to Create Them
Sometimes it’s clear when you’ve reached the end of the road. Sometimes it’s not. It’s also possible to go too far. The same is true for Jira work items. If the scope of a piece of work isn’t well-defined, or if the product manager’s expectations aren’t clear, developers might mark an issue as complete only to have it rejected by the product manager. Acceptance criteria comprise a list of requirements, specific to the story, that must be met for a work item can be considered complete.
Using Acceptance Criteria on your Jira stories removes ambiguity about the expectations and prompts the developers to think about the feature from the user’s point of view. Acceptance Criteria also signal up front what level of testing will need to be done before the feature can be released.
Acceptance Criteria vs User Stories
Acceptance criteria are driven by user stories. If a story states, “As a user, I want to be able to search for all items assigned to me,” then at a minimum your acceptance criteria should ensure that:
- The user is provided with a search bar
- The search function returns the expected results
While your initial acceptance criteria focus on ensuring the expectations outlined in the user story are met, criteria can also refer to the overall user experience such as a consistent and attractive UI, and undiminished performance.

Acceptance Criteria vs Definition of Done
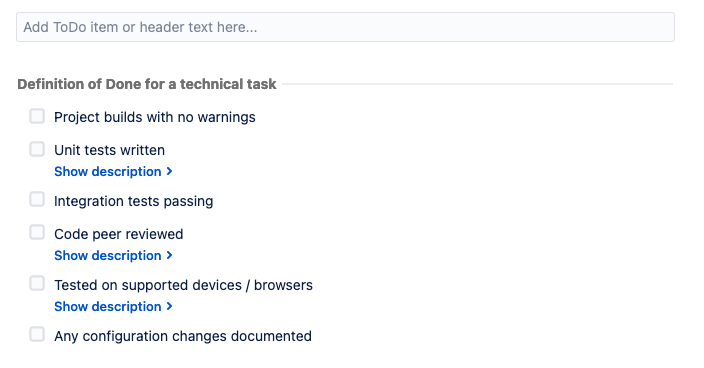
Acceptance criteria is different from Definition of Done. While acceptance criteria are unique to the user story, Definition of Done is the place for defining technical standards you want to apply to all of your development items Both lists should be complete before marking a work item as done.

Learn more about creating Definition of Done lists in Jira.
How to Write Good Acceptance Criteria for Jira Stories
Well-written acceptance criteria allow Product Managers to define features, provide clarity for dev teams, and help ensure customers get what they want. Naturally, there are some criteria for writing good criteria 😉 .
Acceptance criteria should:
- Address the desired functionality of the user story – this is, after all, the point
- Be clear and concise – Use clear, simple language and avoid being overly wordy
- Define the expected behavior – Make it clear what happens as a result of the user’s action
- Be testable – Each criterion should address one (and only one) thing that can be marked pass or fail
Examplesof Jira User Story Acceptance Criteria
Here is an example of acceptance criteria for the creation of global checklists:
User story
As an admin, I want to create a global checklist that I can apply to multiple work items and that cannot be edited and/or by-passed by user.
Acceptance criteria
- The Jira admin can configure the list
- The list can be applied to work items on multiple projects
- The list can be applied to multiple work types
- Users working on the Jira item cannot add items to the list
- Users working on the Jiar item cannot edit items on the list
- Users working on the Jira item cannot delete checklist items
- Users working on the Jira item can toggle items complete/incomplete
- The UI differentiates the global checklist from the local checklist(s)
Adding Acceptance Criteria in Jira
There are several options for creating Acceptance Criteria lists in Jira. You could add it to the Description field, but lumping too much information in an unstructured paragraph field is risky. The PM could forget to include the criteria. The developers could find it difficult to parse the criteria from the other information in the Description.
Atlassian suggests creating a custom field for acceptance criteria, and indeed you can add a paragraph-type field to your Jira stories for acceptance criteria. This solution, however, still leaves you with an unstructured field where it’s difficult to see progress. Since Acceptance Criteria items need to be clearly pass or fail, a checklist is a perfect way to track them and Jira does have a checklist-type custom field. But the checklist items need to be predefined and entered by the Jira administrator, and will be the same for all issues having the custom field – making it an inappropriate option for acceptance criteria.
Action items in a paragraph field offer more sturcture, however they can not be enforced by a workflow validation rule or manipulated by Jira automation.
The best solution is to use Checklists for Jira, which allows you to add checklists to Jira work items. The Product Manager can define the criteria from the outset, making their expectations clear to the dev team.
Adding Acceptance Criteria Lists to Jira Stories
You can create Jira Acceptance Criteria lists simply by clicking into the Checklists UI and typing your criteria items. However, if you want to ensure that Acceptance Criteria are added to all of your Jira stories, consider creating a checklist template.
How to Create a Template for Jira Acceptance Criteria

Since Acceptance Criteria are unique to each story, your Acceptance Criteria template should serve as a prompt, guiding the Product Owner as they define the specific requirements of each story. You can achieve this by creating a placeholder Acceptance Criteria checklist template that is added to new Jira stories by default.
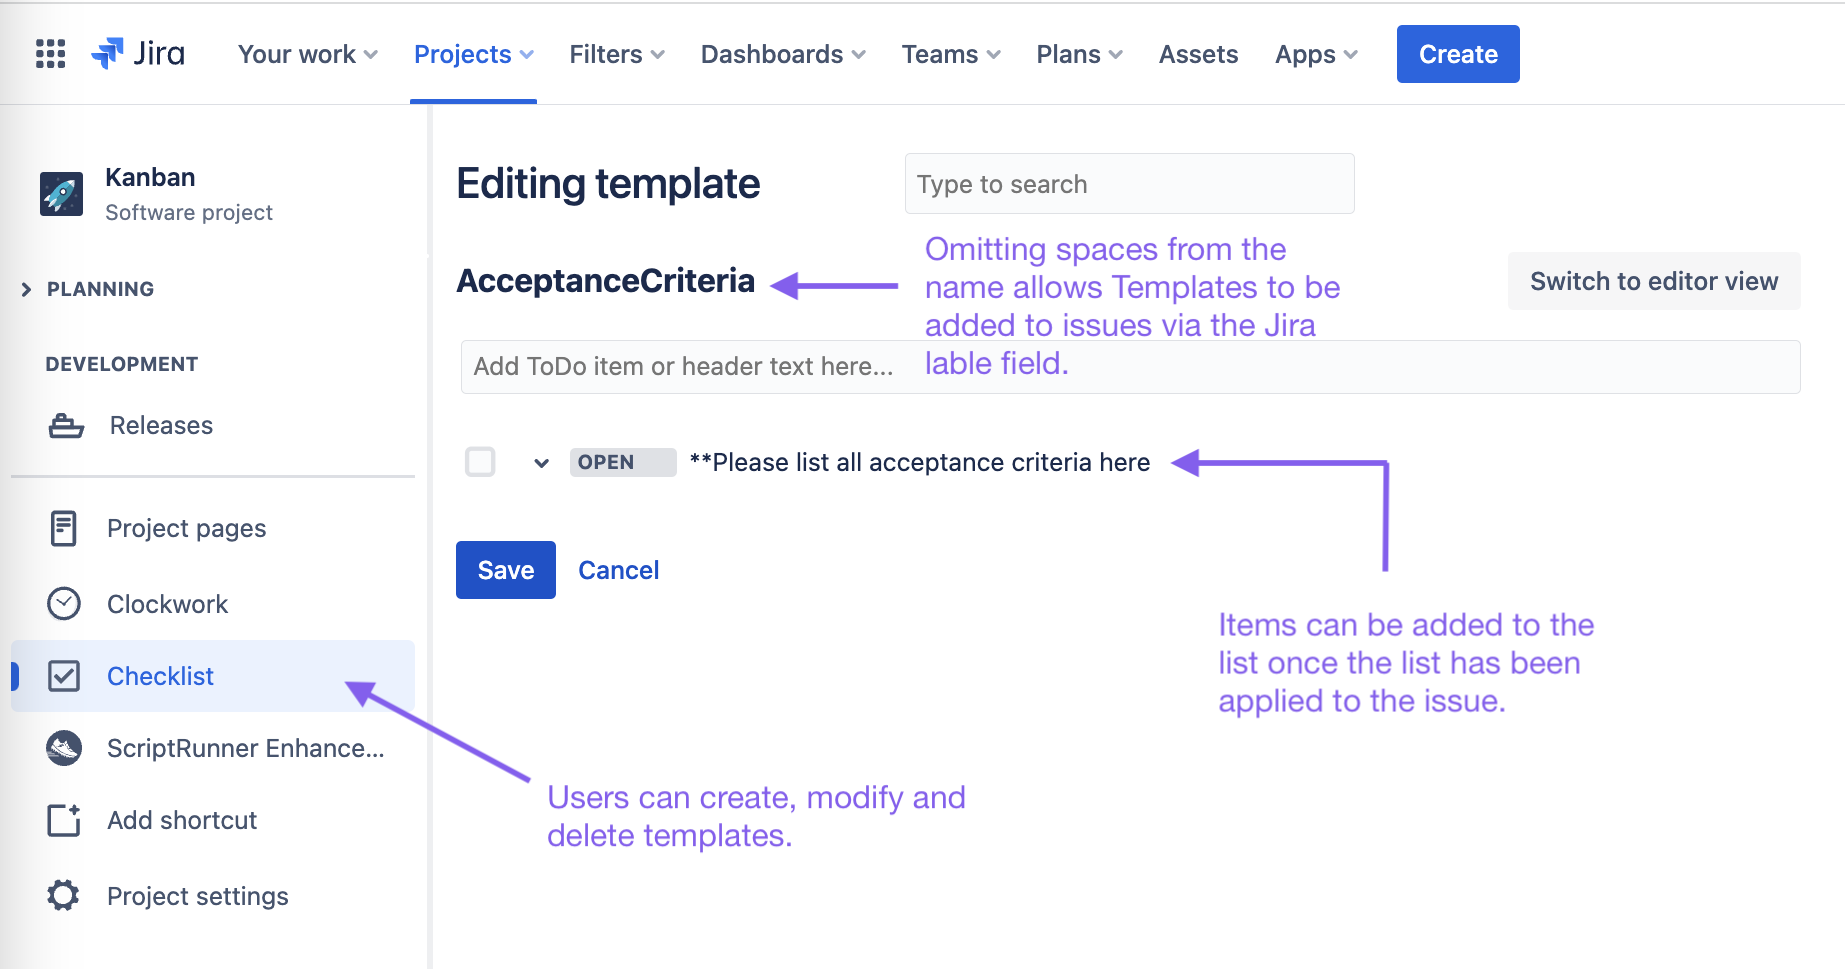
To create a Checklist Template:
- Install Checklists for Jira (Pro).
- Navigate to Checklists in the upper nav bar (it maybe under the More menu).
- Click Create template.
- Name the template, list your criteria and click Save.
- Once your list is created, you can set it as a default template to be automatically applied to when new stories are created.
- The items can be edited once the list has been added to the work item, allowing the product manager to define the specific acceptance criteria when they add the story to the sprint.
That way, everyone knows when they’ve reached the end of the road.


